cowfootball's Cade Reef 1200 S2

cowfootball

Community Member
View Badges
Joined
Apr 19, 2024
Messages
65
Reaction score
33
Location
California
Rating - 0%
0   0   0
I've been setting this tank up the last week or two and unfortunately didn't take a lot of great pictures while doing it but I'm due for a thread so you'll have to excuse some of the random snaps.

I've always kept freshwater tanks and told myself that when we finally bought our long-term house that I'd build myself a nice sized mixed reef. Well, we bought a house 4 years ago and I'm only just now getting around to it, so here we are. This is in rural Northern California so no quick LFS trips for me and no basement but we're making it work!

I really only had 2 goals for this project. I wanted it to be as low maintenance as is reasonable and I wanted a mixed reef.

The build:
- Cade Reef S2 1200. 135 gallon total, 114 gal display, 21 gal sump, 11.7 gal ATO.
- Abyzz A100 return pump.
- 2 XF330 gyre cloud editions.
- CoralVue Hydros for automation. I already had an XP8 and an XS from an old freshwater tank and I added an X4 and a WaveEngine 2.
- ReefMat 1200
- ReefDose 4
- Reef Octopus Regal 150 INT 6" skimmer with an Avast Marine Works neck cleaner and Reef Octopus 6" waste collector.
- 3 XR15 G6 Pro lights (I started with 2 and was unhappy.)
- Aqua 57w UV sterilizer.
- Avast plank auto feeders.

The ATO on the Cade wasn't really a value add for me personally because I intend to plumb it directly but I 1) appreciated that the weir is external, 2) that the back was blacked out since this is going against a wall and 3) I really quite like the cabinetry. 2 isn't really a very important point, it's not hard to black out a tank rear, and 1 could be achieved with an IM EXT 150 which was my second choice, leaving 3 really as the deciding factor. The Cade cabinet sides are also doors, giving you really nice access to every aspect of the sump, and the right hand side is a dedicated control panel space. It also has a matching standalone cabinet for my 5 gallon freshwater shrimp tank and would keep everything matching which was a big lus.

I went with a 4ft tank because I thought it was all I could reasonably fit but after installing the 4ft tank we realized the whole room really needed some renovation and when all was said and done, a 6ft tank would have been great. C'est la vie.
 
Last edited:
OP
OP
cowfootball

cowfootball

Community Member
View Badges
Joined
Apr 19, 2024
Messages
65
Reaction score
33
Location
California
Rating - 0%
0   0   0
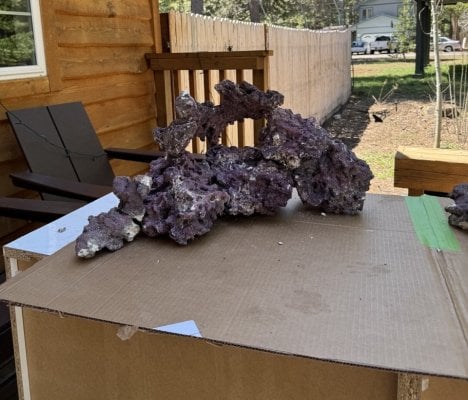
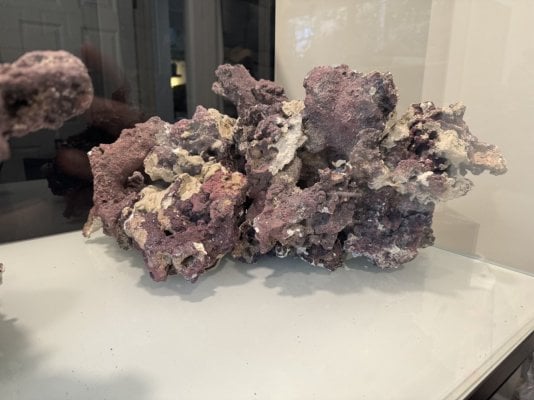
First up: the rock work. We started the rock work about a week before the tank came using CaribSea LifeRock. I think the final total of what went into the tank is about ~120 pounds.

The goal was to create something visually appealing that also allows for appropriate fish sanctuaries and enough mounting points for various corals. I really wanted to give myself the option to run soft, SPS or LPS and so I tried to provide options for high flow, low flow, high light and low light.

This was a lot of CA glue and fastact epoxy on a cardboard cutout.

Note for others who do this with a Cade: the Cade dimensions include the ATO reservoir on the back which is (obviously) not usable space. It worked out okay for us but when I put it in the tank I was like "huh, I thought I had a good 3" of space back here". I did not.

IMG_4226 Large.jpeg
IMG_4236 Large.jpeg
img_4231-large-jpeg.3652172
IMG_4225 Large.jpeg
 

Attachments

  • IMG_4231 Large.jpeg
    IMG_4231 Large.jpeg
    297.3 KB · Views: 338
OP
OP
cowfootball

cowfootball

Community Member
View Badges
Joined
Apr 19, 2024
Messages
65
Reaction score
33
Location
California
Rating - 0%
0   0   0
Finally, the tank arrived. I unfortunately didn't snap any pictures of the delivery but the Cade tanks came extremely well packed in plywood boxes with metal reinforcement. Unpacking it was a huge pain in the butt but at least as a result everything was totally unharmed.

I hired some movers to help me get this into it's final place as it had to navigate through a hallway with tight L turns at both ends. We had to flip the tank up vertically to get it through but the professionals handled it without any issues.

One annoying thing about this location is that it's an exterior wall and the floor joists run parallel with 4ft spacing, making this tank dead center in a 4ft void. I had a local engineer, who has a good crew with him, come out run two new 2x10s in the space supported by 8 new footings. I'd normally DIY this but my crawlspace is only 3ft high and digging footings and pouring concrete in that space was... not appealing.

I also plumbed in a laundry box with dedicated hot (never to be used but I was there so why not), cold and drain. Cold will go to a BRS 5 stage RODI system in the closet not pictured further right.

IMG_4245 Large.jpeg
IMG_4244 Large.jpeg
 
Last edited:
OP
OP
cowfootball

cowfootball

Community Member
View Badges
Joined
Apr 19, 2024
Messages
65
Reaction score
33
Location
California
Rating - 0%
0   0   0
Next up: getting the rocks and sand in. I underestimated just how heavy I had made the "focal" piece on the left side here. It's probably 70 pounds and lifting it up and over the edge of the glass and then safely back down in was nerve-racking. I ended up covering the entire tank in towels, placing it on to the towels and then lifting one side at a time to pull the towels out. Alls well that ends well...

After that, sand went in. 60 pounds of Carib Sea Arag-Alive Special Grade.

IMG_4256 Large.jpeg

IMG_4257 Large.jpeg

IMG_4258 Large.jpeg


IMG_4260 Large.jpeg

IMG_4261 Large.jpeg

IMG_4262 Large.jpeg
 

Attachments

  • IMG_4259 Large.jpeg
    IMG_4259 Large.jpeg
    151.9 KB · Views: 44
OP
OP
cowfootball

cowfootball

Community Member
View Badges
Joined
Apr 19, 2024
Messages
65
Reaction score
33
Location
California
Rating - 0%
0   0   0
Then the fill...

This is my very early plumbing and initial set-up, using a Varios 4 as my return while waiting for the A100. The Varios4 eventually becomes my UV sterilizer closed loop pump. I initially had the Hydros equipment mounted on the panel with some 15 lb rated velcro but honestly it didn't hold. The XP8 is heavy and I eventually drilled some holes and used nyloc nuts to keep it all secured.

IMG_4269 Large.jpeg
 
OP
OP
cowfootball

cowfootball

Community Member
View Badges
Joined
Apr 19, 2024
Messages
65
Reaction score
33
Location
California
Rating - 0%
0   0   0
It was at this point I noticed what I was worried was a defect in the front of the Cade.

Algae Barn customer support were excellent. They gave me an initial triage (it's probably fine) but said they'd reach out to Cade and had some back and forth with me. Ultimately we concluded that the foam mat had some styrofoam between it in packing that deformed it a little and over time it would even back out (it has). The more concerning part, to me, was in the lower right where a small sliver of silicon is missing along the bottom seam and the foam has filled the gap in. Cade are confident this isn't an issue but I'm keeping an eye on it anyway.

IMG_4270 Large.jpeg

IMG_4272 Large.jpeg
IMG_4273 Large.jpeg
IMG_4271 Large.jpeg

IMG_4274 Large.jpeg

IMG_4275 Large.jpeg
IMG_4276 Large.jpeg
 
OP
OP
cowfootball

cowfootball

Community Member
View Badges
Joined
Apr 19, 2024
Messages
65
Reaction score
33
Location
California
Rating - 0%
0   0   0
Tank finally full and dry fitting the sump. In my haste and stupidity I picked up the Regal 150INT by the removable skimmer cup, dropping it to the ground where it landed on the Varios 2S pump, snapping the acrylic connection. Emergency Weld-On #4 to the rescue and that one is still holding.
IMG_4248 Large.jpeg

IMG_4287 Large.jpeg
 
Last edited:
OP
OP
cowfootball

cowfootball

Community Member
View Badges
Joined
Apr 19, 2024
Messages
65
Reaction score
33
Location
California
Rating - 0%
0   0   0
It was at this point that I realized the ReefMat 1200 really doesn't fit very well in the Cade.

1715485899763.png

The large baffle, intended for a refugium, is removable and so that went immediately. But that wasn't really the issue: the issue was getting the hose from the bottom of the ReefMat, through the hole under the filter socket compartment, and back up to the main drain. I ended up using a razor blade to remove the filter sock mounts entirely and the glass panel dividing the main and emergency drain compartments which allowed me to snake the flexible hose awkwardly round.

A couple of plumbing notes for future Googlers:

- The Cade main drain is 40mm metric.
- The ReefMat flexible hose supports direct insertion of 32mm PVC using their sealant.
- This puts you in kind of an awkward spot: you can stay entirely metric and get a 40mm to 32mm metric reducer, you can get a 40mm metric to 1 1/4" metric-to-standard union and then find a way to get that 1 1/4" into the flexible hose or you can say screw it and throw that flexible hose in the trash.

I threw the flexible hose in the trash. The plumbing complexity wasn't the only reason, though. What ultimately sealed the deal was that the awkward hose run was trapping air in the tube corrugations, resulting in the occasional release and deliciously infuriating gurgling from the ReefMat.

I created this monstrosity. I cut the 40mm Cade main drain as high up as possible and then fit a 40mm to 1 1/4" metric to standard union on it, into a 1 1/4" street 90, into two 1 1/4" street 45s, into a 1 1/4" to 1" reducer, into a 1" 90, into a 1" union. I used a standard 1" union but took the flange out and placed it inside the original Red Sea threaded collar.

This worked beautifully but because of the height of the water in the sump (~8.2") and the ReefMat hanging on the back, the inlet is not completely submerged. It wasn't sealed right and so I was sucking in some air through the collar into the ReefMat. I fixed this with some Blue Monster PTFE tape which is rated for use on PVC. I also had to do this on the other side of the ReefMat where the second inlet has a cap.

Voila, no noise and I gained a good 4" of space back in my sump and no longer have a ridiculous corrugated hose run through 4 separate openings and bends.

IMG_4386 Large.jpeg


IMG_4382 Large.jpeg
 
Last edited:
OP
OP
cowfootball

cowfootball

Community Member
View Badges
Joined
Apr 19, 2024
Messages
65
Reaction score
33
Location
California
Rating - 0%
0   0   0
Test fitting the lights.

I grabbed my MQ-510 and learned what I had suspected was the case: the PAR with the XR15's in this configuration kind of sucks. ~250 about an inch under the surface down to a meager ~75 at the sand. I wanted the option to run some SPS at some point and it's clear this won't really cut it. I ordered a 3rd XR15 G6 Pro and I'll flip their coverage so that the longer size runs perpendicular to the width of the tank.

The other thing I learned here is even more annoying: because of the ATO at the back of the tank, the Cade 1200 is 3" deeper than most other 4ft tanks meaning that the XR15 RMS arms don't come out far enough to sit centered over the tank. This isn't particularly an issue except for my OCD. I learned that the XR30 RMS arms are identical to the XR15 ones except that they come with a longer extension piece. I reached out to EcoTech and was told they don't offer the longer arm alone so I returned the XR15 arms and replaced them with XR30 ones.

Side note: the net included with the Cade kind of sucks. It's flimsy and the center sags into the water. I ordered a Kraken.

IMG_4300 Large.jpeg


IMG_4299 Large.jpeg

IMG_4298 Large.jpeg
 
OP
OP
cowfootball

cowfootball

Community Member
View Badges
Joined
Apr 19, 2024
Messages
65
Reaction score
33
Location
California
Rating - 0%
0   0   0
Next up was testing the flow on the XF330 cloud editions with the WE2. This was super painful. I considered returning the WE2 at one point.

When first connected up and placed into gyre mode in the WE2, the XF330s immediately threw "check pump" errors. After a lot of back-and-forth with CoralVue support, who were honestly not at all helpful but motivated me to continue trial and erroring the configuration, I learned that the XF330 require a minimum power setting of 40%. If the pumps are ever given power below 40%, they will immediately throw a check pump error.

I asked CoralVue if this was expected. I understand that pump require a minimum wattage to spin but 40% seemed high to me. I was informed that the XF330 cloud edition isn't yet rated for use with the WaveEngine and they haven't tested them. This seems like somewhat of a copout as while we do know there are some design changes with the Cloud Edition XF330s, I would have at least liked to know if a 40% minimum power was normal on the non-cloud XF330.

I haven't yet figured out how I'm going to schedule these. I'm running the A100 at 65% which is about ~1040gph with my head height and so I probably need to tune that down a little before spending some time here.

IMG_4345 Large.jpeg
 
OP
OP
cowfootball

cowfootball

Community Member
View Badges
Joined
Apr 19, 2024
Messages
65
Reaction score
33
Location
California
Rating - 0%
0   0   0
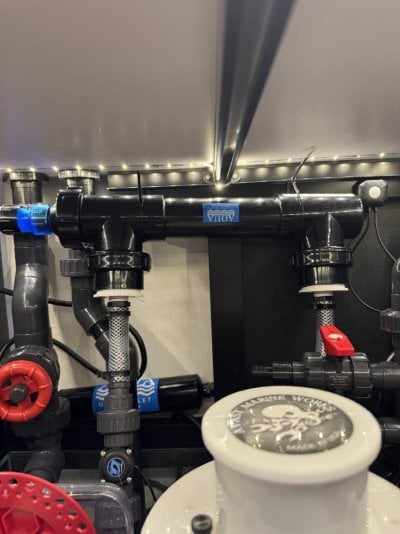
Last thing on my to do list this weekend was finally plumbing in the Aqua 57W that's been sitting on the floor for a week. I went back and forth on the best way to do this. The Cade includes 3 manifolds: 2 in the main sump chamber and one in the right storage chamber, intended for a chiller.

But I really didn't want to use these. I want the option to run the UV as a closed loop so I can finely tune the gph way down and trying to balance a return pump on a manifold seemed too restrictive.

The other thing I noticed was that because my main drain now goes directly to the ReefMat, much of the sumps water capacity in the old filter sock area was a dead spot and was collecting every random piece of garbage I'd dropped into the sump over the last week.

So I decided to use my Varios4 in a closed loop to pick-up from the sump chamber post-ReefMat and to drop it straight back into the same chamber. I'm not 100% sold on this yet -- I might inlet from this chamber and then dump it into the return pump chamber to reduce recycling -- but this does solve my dead spot issues and promote more flow in the sump.

I ran 3/4" braided vinyl from the Varios4 to the Aqua and then used a Hydros 3/4 flow sensor on the outlet so I could finally tune my sterilization. This had the benefit that I could switch to PVC from the other side of the flow sensor so I wouldn't have to worry about trying to secure vinyl hose somehow in the sump.

IMG_4424 Large.jpeg


IMG_4430 Large.jpeg
 

Attachments

  • IMG_4423 Large.jpeg
    IMG_4423 Large.jpeg
    134.7 KB · Views: 47
OP
OP
cowfootball

cowfootball

Community Member
View Badges
Joined
Apr 19, 2024
Messages
65
Reaction score
33
Location
California
Rating - 0%
0   0   0
So, here we are, on day 5 of the cycle looking like we're almost done. 0 ammonia this morning so I dosed 2ppm and I'll check it tomorrow.

One last bonus piece of work I did while waiting on the cycle: the doors on the Cade cabinet are inset about the exact thickness of Second Skin's Luxury Liner Pro soundproofing. I used it on my truck a few years ago and had some spare so got it set-up in all of the doors and the room is now dead silent except for when the XF330's spin up.

IMG_4433 Large.jpeg
IMG_4432 Large.jpeg
IMG_4431 Large.jpeg
 
OP
OP
cowfootball

cowfootball

Community Member
View Badges
Joined
Apr 19, 2024
Messages
65
Reaction score
33
Location
California
Rating - 0%
0   0   0
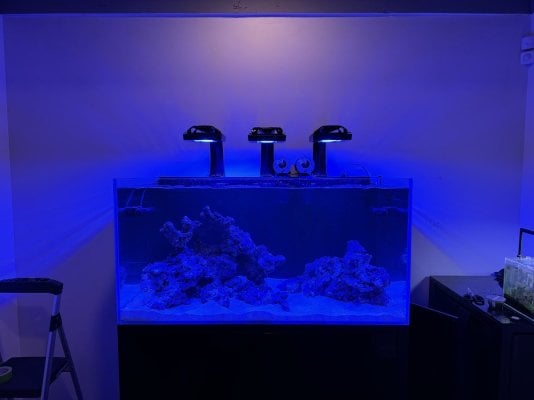
All 3 XR15’s mounted as well as the Avast Plank Feeders. PAR is now excellent. At 60% I’m at ~100 on the floor and ~250 on the tips of the rock, so lots of room upward (or downward at this rate!) if I need to.

I did have one slight snafu moving the lights around… one dropped in the water. I pulled it apart and gave it a 99% isopropyl bath, a scrub with a toothbrush and then zip locked it with a bag of desiccant overnight. Powered up the next morning like nothing happened. Phew.

Cycle is done so the skimmer and UV are running now. Lights are staying off for another few days until I dose some coralline then on they go.

IMG_4459.jpeg
 
OP
OP
cowfootball

cowfootball

Community Member
View Badges
Joined
Apr 19, 2024
Messages
65
Reaction score
33
Location
California
Rating - 0%
0   0   0
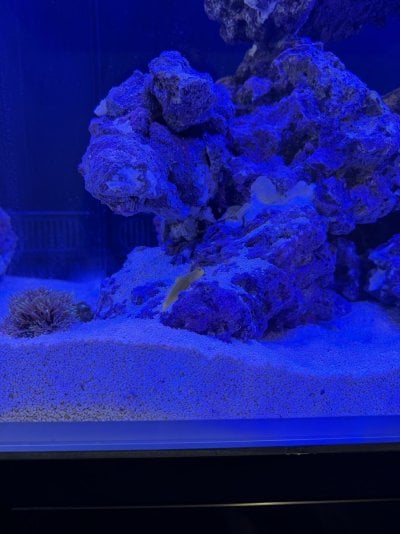
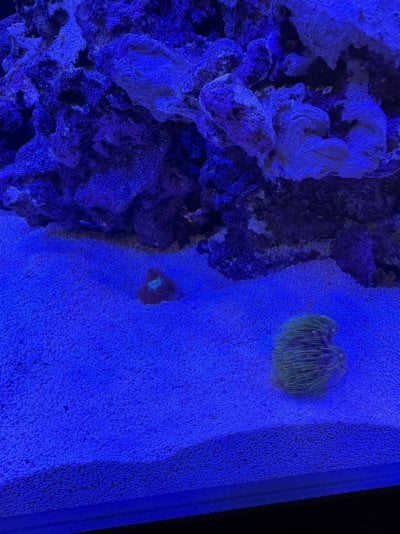
Two clownfish and a YWG in this morning as well as a couple of random frags to see how they survive (and honestly to make it a little easier to spot flow): a Xenia, a GSP and a Zoa.

IMG_4495 Large.jpeg

IMG_4497 Large.jpeg

IMG_4512 Large.jpeg


~24 hours later I started tuning my Avast Plank Feeder and both the Clownfish and the YWG took to Reef Jerky immediately. I've used Eheim Autofeeders for years and I have to tell you even just touching the Avast Plank Feeder made me happy. It feels like quality.

I also thought I'd give Algae Barns guide to conditioning dry rock a go. I figure there's a 50/50 chance that this is snakeoil but I was going to buy some codepods anyway so why not give it a shot? You know, for science.

It starts with spending $110 on this pack and just to really commit to wasting some money online shopping I also grabbed some Pink Helix Coralline in a bottle.

So, UV, skimmers and fleece roller is off for the next couple of hours. The coralline bottle says ~10 weeks so, uh, expect to hear from me in 10 weeks, I guess.
 

afternoondelight

Active Member
View Badges
Joined
Feb 21, 2024
Messages
110
Reaction score
69
Location
Melbourne
Rating - 0%
0   0   0
Everything is looking great!! I've been going through a lot of the growing pains you've been experiencing as I set up my Cade 1500 S2. I just finished my cycle, but ran into all sorts of issues with the plumbing and trying to get my sump gadgets hooked up and rolling along.

I'm getting more and more familiar with the setup and it sounds like you and I have the same ideas and have bought a lot of the same stuff...lol. Same, but different.

I'm interested to see how your pods and rock conditioning go.

Following!

Looking GOOD Billy Ray!
 
OP
OP
cowfootball

cowfootball

Community Member
View Badges
Joined
Apr 19, 2024
Messages
65
Reaction score
33
Location
California
Rating - 0%
0   0   0
Everything is looking great!! I've been going through a lot of the growing pains you've been experiencing as I set up my Cade 1500 S2. I just finished my cycle, but ran into all sorts of issues with the plumbing and trying to get my sump gadgets hooked up and rolling along.

I'm getting more and more familiar with the setup and it sounds like you and I have the same ideas and have bought a lot of the same stuff...lol. Same, but different.

I'm interested to see how your pods and rock conditioning go.

Following!

Looking GOOD Billy Ray!

Thanks! I saw your thread too while I was researching!

Codepods seem to be doing OK. There’s still a visible population left about a week later. No sign of coralline but it has only been a week ;)

It turns out the Varios4 really struggles once you downsize to 3/4” barb. At a head height of 1ft I should be getting >800 gph but I’m getting barely 350.

This is actually an issue. Anything under 10gph/watt is liable to kill codepods and phyto so UV is off until I can grab some 1” flex PVC. It’s a 57w aqua so I really need to be aiming for >570gph for bacteria/parasite control.
 

Attachments

  • IMG_4577.jpeg
    IMG_4577.jpeg
    25.3 KB · Views: 51

Gumbies R Us

Certified Noob
View Badges
Joined
Nov 10, 2022
Messages
14,188
Reaction score
24,058
Location
North Georgia
Rating - 0%
0   0   0
Two clownfish and a YWG in this morning as well as a couple of random frags to see how they survive (and honestly to make it a little easier to spot flow): a Xenia, a GSP and a Zoa.

IMG_4495 Large.jpeg

IMG_4497 Large.jpeg

IMG_4512 Large.jpeg


~24 hours later I started tuning my Avast Plank Feeder and both the Clownfish and the YWG took to Reef Jerky immediately. I've used Eheim Autofeeders for years and I have to tell you even just touching the Avast Plank Feeder made me happy. It feels like quality.

I also thought I'd give Algae Barns guide to conditioning dry rock a go. I figure there's a 50/50 chance that this is snakeoil but I was going to buy some codepods anyway so why not give it a shot? You know, for science.

It starts with spending $110 on this pack and just to really commit to wasting some money online shopping I also grabbed some Pink Helix Coralline in a bottle.

So, UV, skimmers and fleece roller is off for the next couple of hours. The coralline bottle says ~10 weeks so, uh, expect to hear from me in 10 weeks, I guess.
Love the fish in your tank!
 

afternoondelight

Active Member
View Badges
Joined
Feb 21, 2024
Messages
110
Reaction score
69
Location
Melbourne
Rating - 0%
0   0   0
Thanks! I saw your thread too while I was researching!

Codepods seem to be doing OK. There’s still a visible population left about a week later. No sign of coralline but it has only been a week ;)

It turns out the Varios4 really struggles once you downsize to 3/4” barb. At a head height of 1ft I should be getting >800 gph but I’m getting barely 350.

This is actually an issue. Anything under 10gph/watt is liable to kill codepods and phyto so UV is off until I can grab some 1” flex PVC. It’s a 57w aqua so I really need to be aiming for >570gph for bacteria/parasite control.
I haven't started my UV yet, but good to know (about the pump output with 3/4". I am using a Sicce SDC 3 for my dedicated UV pump and don't want to nuke all my pods. Will revisit all this when I get things going later down the road. I plan on using either an algae scrubber or reactor if/when I need the nutrient export. No room left in my sump for a refugium and truthfully don't really want the light bleed over down there...
 
OP
OP
cowfootball

cowfootball

Community Member
View Badges
Joined
Apr 19, 2024
Messages
65
Reaction score
33
Location
California
Rating - 0%
0   0   0
Quick update before I head off on vacation for the week.

My YWG has settled in and has started resting on rocks to watch instead of just hiding in his cave all day. He’s also started coming to the top for food from the Plank Autofeeder which is working incredibly well. The Reef Jerky from Avast in the Plank is honestly game changing. It has entire pieces if mysis shrimp and after they hydrate in the Plank, you couldn’t tell that they didn’t come from a frozen cube — and the YWG hunts them down and snaps them up.

I did have to set up my XF330’s to turn off for 15 minutes after the plank runs because the flow was a little much for the Goby.

I have 6 frags in right now: a GSP, a Zoa, a mystery Xenia, a mystery bubble and an Aussie torch. They all seem to be doing well.

The ugly phase is setting in a little. I’m starting to get some cyano on the sand and rocks and while it’s not too bad yet I imagine I’ll come back on Sunday to a different story. ;)
 

Attachments

  • IMG_4653.jpeg
    IMG_4653.jpeg
    183 KB · Views: 39
  • IMG_4654.jpeg
    IMG_4654.jpeg
    255.3 KB · Views: 38

afternoondelight

Active Member
View Badges
Joined
Feb 21, 2024
Messages
110
Reaction score
69
Location
Melbourne
Rating - 0%
0   0   0
Looking good. I have a a couple of clown fish coming in this week that I will be QTIng and my pods from Algae Barn also come as well. I am going to wait a couple of months before I put any coral in there and hopefully by keeping the lights off I can avoid some of the uglies… We shall see!
 

HAVE YOU EVER KEPT A RARE/UNCOMMON FISH, CORAL, OR INVERT? SHOW IT OFF IN THE THREAD!

  • Yes!

    Votes: 32 45.7%
  • Not yet, but I have one that I want to buy in mind!

    Votes: 9 12.9%
  • No.

    Votes: 26 37.1%
  • Other (please explain).

    Votes: 3 4.3%
Back
Top