75 gallon first reef tank - let's go!

Eric_T

New Member
View Badges
Joined
Jan 30, 2023
Messages
9
Reaction score
50
Location
USA
Rating - 0%
0   0   0
Hi all

So here we go! I've kept freshwater planted tanks for 20 plus years. I'm familiar with some stuff to a point, but for the sake of salt I'm trying to start completely over with learning the hobby. I dove into the 5 minute reef guide BRS thing, which was amazing and super helpful, and just absorbing a ton of BRS videos as I go. And if you thought this thread wasn't going to be filled with water puns, boy are you gonna end up... drained.

So via 2 local online sales I have picked up a truckload of gear and a nice tank and sump. And barrels full of dry rock! 3 total now. Not even sure if I'm going to use it though. Let me try to explain what I have so far, and where I'm thinking about going with things.

The goal is a nice mixed tank I can start out with fish and live rock, appropriate depth sandbed as well - I really want a goby! Then eventually start adding corals, anemone for clownfish, the usual stuff. I hope to start the tank with the basics and as I learn, progress into more advanced stuff as well.

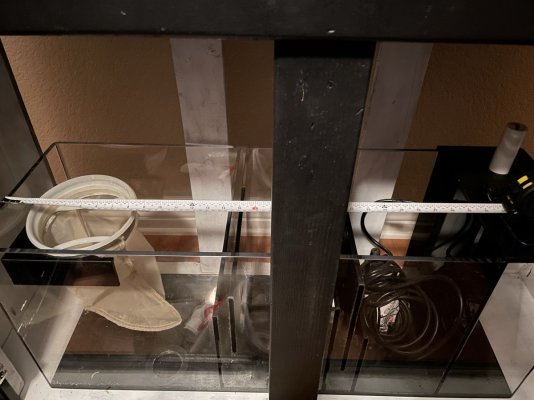
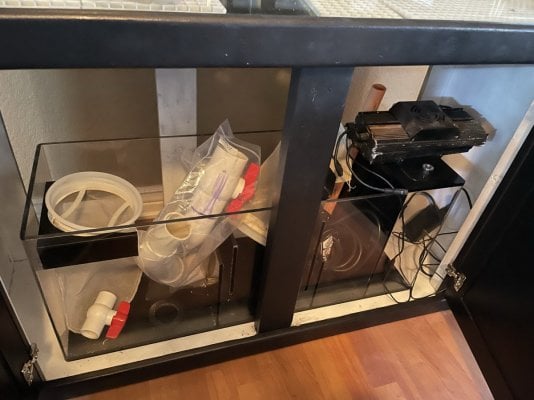
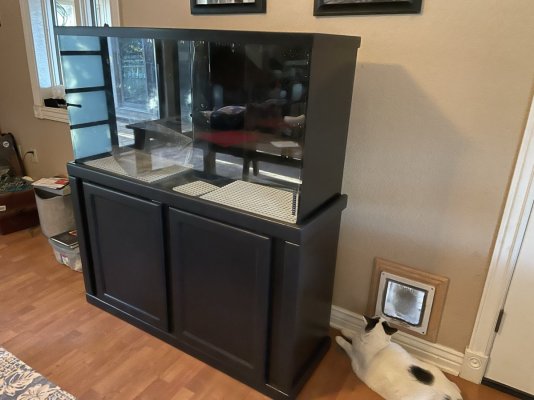
I don't know the make or model of the tank or sump, but they seem really nice. The sump also has an attached auto topoff reservoir on the right there, which I definitely plan to employ. The tank is drilled, and has 2 returns on it which are currently plumbed together - and while it did come with a single pump I am strongly considering replacing the single pump with 2 that push half the rate, that way I have some redundancy. My background is IT so monitoring and redundancy - mandatory.

Not shown is a seaclone protein skimmer that will get plumbed into the sump. Online reviews seem mixed on it, but it should provide a good start. That one was in a 175 gallon previously, not sure if it was enough for that though. I have a literal hefty bag full of bio balls as well.

The lights on the sump are popbloom turing 30s, which while older should still suffice. I read about people soldering and replacing the LEDS, that's in my wheelhouse to do if needed. I have 4 of those lights in total, I'm guessing 2 will do the tank nicely. I ordered a couple of arms to sit them above the tank, for now. I may make a pendant style hangar for them later, I also have a shop to do custom woodwork in, also handy for doing acrylic work so I could even make myself a better skimmer when the time comes.

My gear theory that I'm playing around with for now, not yet ordered so I'm just getting my ideas together here first- so stuff I am considering for this build-

Dual return pumps from the sump.
Dual heaters, on controllers.
Just a good power strip for now, 2 if necessary. No controller just yet.
Return nozzles. I have a pair from the first used tank I picked up, they arent the same size as what is drilled in the 75 so either I make some adapters or get better ones, leaning towards the latter. Saw some "random flow" nozzles that piqued my interest.
Powerheads... I have a box full. Might be good - might be junk. I'll add a pic of those later.
Sticking with the filter socks for now, in the future the auto roller filters are a really neat idea. Not cheap though, so I'm waiting for future upgrades on that purchase.
UV sterilizer - these seem like a really solid upgrade that isn't all that expensive to add.
Some auto topoff sensor/pump.
A new water filter so I can cook up RODI. I'll ask more about that below.
The main area of the sump seems like a great place to shove some of the macroalgae for a refugium. I could put in one of my extra popbloom 40 leds and program it accordingly - that might be overkill though, might be smarter to buy a refugium specific light, slap on a timer etc etc. I'm unsure when that should happen in the build process though, maybe not right away?
I really like the seneye monitoring system. Cheap enough to be in my budget, and can also be used as a par meter. I'm big on multi use gear, that seems like a great way to go.
Some sort of battery backup that can hold all of this up. Or at least the critical stuff, in a power outage the UV sterilizer can chill out I think, etc.
I'm working with krakenreef for a nice mesh lid up top. But if anyone thinks they know the tank manufacturer let me know, that could help!

As you can see the tank is empty and confusing the oversized cat below. That.. doesn't take much to do accomplish. So to get going I need to be able to cook up some saltwater, here comes some questions on that! And feel free to point me to resources instead of explaining, like I said earlier I am trying to start my learning over from scratch on this.

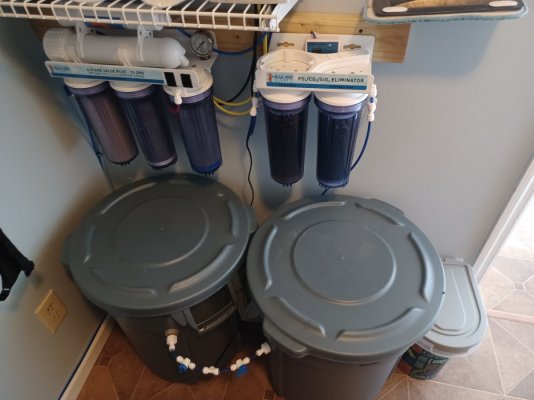
We have a water filter that is under the kitchen sink that is old and I would like to replace in full. So a nice filter would be good. I'm considering adding some sort of feed line of a valve that can reach a 55 gallon bucket on wheels that I can cook salt water in, as opposed to say hooking this all up in my laundry room where its good for making salt water but not much else. Say have it run the first few stages, tee off into the drinking water system, but then be valve switchable into the remaining DI stages for making saltwater.

Here's a fun question though - 75 gall plus 20gallon sump, I need to cook up about 100 gallons of water. How do I uhhhhh start the tank if I'm only making 50 gallons at a time? Is it okay to just chill out in the tank? I can drop a powerhead in there and a heater I suppose. I'm not really sure.

My next big question, what should if anything be reused. I have a 5 gallon bucket of sand from the old tank. Should I rinse it and cut it 50/50 with new caribsea live sand? Or is that risky and dumb? Additionally I have a huge amount of dry rock. 3x55 gallon buckets of it. I don't think I want to cycle with only dry rock, I would rather get some live rock just to get things moving sooner. But again, should I plan for 50/50 with the dry rock to save on costs?

This is an expensive hobby and I would rather have the money for critters than gear, but I also want to give them a good safe home. So I'm looking to only cut costs where it's smart to do so. I'm also trying to set things up the right way first, so I don't mind taking my time with it. Flip side of that coin - that's an empty tank in my living room. I'm looking forward to progressing that into at least having some water in it!

Thanks for looking, that's quite the brain dump there. Feel free to point me to any resources you feel appropriate, ask me any questions you like etc. Take care!
IMG_1867.jpeg IMG_1866.jpeg
 

Gumbies R Us

Certified Noob
View Badges
Joined
Nov 10, 2022
Messages
14,188
Reaction score
24,058
Location
North Georgia
Rating - 0%
0   0   0
Hi all

So here we go! I've kept freshwater planted tanks for 20 plus years. I'm familiar with some stuff to a point, but for the sake of salt I'm trying to start completely over with learning the hobby. I dove into the 5 minute reef guide BRS thing, which was amazing and super helpful, and just absorbing a ton of BRS videos as I go. And if you thought this thread wasn't going to be filled with water puns, boy are you gonna end up... drained.

So via 2 local online sales I have picked up a truckload of gear and a nice tank and sump. And barrels full of dry rock! 3 total now. Not even sure if I'm going to use it though. Let me try to explain what I have so far, and where I'm thinking about going with things.

The goal is a nice mixed tank I can start out with fish and live rock, appropriate depth sandbed as well - I really want a goby! Then eventually start adding corals, anemone for clownfish, the usual stuff. I hope to start the tank with the basics and as I learn, progress into more advanced stuff as well.

I don't know the make or model of the tank or sump, but they seem really nice. The sump also has an attached auto topoff reservoir on the right there, which I definitely plan to employ. The tank is drilled, and has 2 returns on it which are currently plumbed together - and while it did come with a single pump I am strongly considering replacing the single pump with 2 that push half the rate, that way I have some redundancy. My background is IT so monitoring and redundancy - mandatory.

Not shown is a seaclone protein skimmer that will get plumbed into the sump. Online reviews seem mixed on it, but it should provide a good start. That one was in a 175 gallon previously, not sure if it was enough for that though. I have a literal hefty bag full of bio balls as well.

The lights on the sump are popbloom turing 30s, which while older should still suffice. I read about people soldering and replacing the LEDS, that's in my wheelhouse to do if needed. I have 4 of those lights in total, I'm guessing 2 will do the tank nicely. I ordered a couple of arms to sit them above the tank, for now. I may make a pendant style hangar for them later, I also have a shop to do custom woodwork in, also handy for doing acrylic work so I could even make myself a better skimmer when the time comes.

My gear theory that I'm playing around with for now, not yet ordered so I'm just getting my ideas together here first- so stuff I am considering for this build-

Dual return pumps from the sump.
Dual heaters, on controllers.
Just a good power strip for now, 2 if necessary. No controller just yet.
Return nozzles. I have a pair from the first used tank I picked up, they arent the same size as what is drilled in the 75 so either I make some adapters or get better ones, leaning towards the latter. Saw some "random flow" nozzles that piqued my interest.
Powerheads... I have a box full. Might be good - might be junk. I'll add a pic of those later.
Sticking with the filter socks for now, in the future the auto roller filters are a really neat idea. Not cheap though, so I'm waiting for future upgrades on that purchase.
UV sterilizer - these seem like a really solid upgrade that isn't all that expensive to add.
Some auto topoff sensor/pump.
A new water filter so I can cook up RODI. I'll ask more about that below.
The main area of the sump seems like a great place to shove some of the macroalgae for a refugium. I could put in one of my extra popbloom 40 leds and program it accordingly - that might be overkill though, might be smarter to buy a refugium specific light, slap on a timer etc etc. I'm unsure when that should happen in the build process though, maybe not right away?
I really like the seneye monitoring system. Cheap enough to be in my budget, and can also be used as a par meter. I'm big on multi use gear, that seems like a great way to go.
Some sort of battery backup that can hold all of this up. Or at least the critical stuff, in a power outage the UV sterilizer can chill out I think, etc.
I'm working with krakenreef for a nice mesh lid up top. But if anyone thinks they know the tank manufacturer let me know, that could help!

As you can see the tank is empty and confusing the oversized cat below. That.. doesn't take much to do accomplish. So to get going I need to be able to cook up some saltwater, here comes some questions on that! And feel free to point me to resources instead of explaining, like I said earlier I am trying to start my learning over from scratch on this.

We have a water filter that is under the kitchen sink that is old and I would like to replace in full. So a nice filter would be good. I'm considering adding some sort of feed line of a valve that can reach a 55 gallon bucket on wheels that I can cook salt water in, as opposed to say hooking this all up in my laundry room where its good for making salt water but not much else. Say have it run the first few stages, tee off into the drinking water system, but then be valve switchable into the remaining DI stages for making saltwater.

Here's a fun question though - 75 gall plus 20gallon sump, I need to cook up about 100 gallons of water. How do I uhhhhh start the tank if I'm only making 50 gallons at a time? Is it okay to just chill out in the tank? I can drop a powerhead in there and a heater I suppose. I'm not really sure.

My next big question, what should if anything be reused. I have a 5 gallon bucket of sand from the old tank. Should I rinse it and cut it 50/50 with new caribsea live sand? Or is that risky and dumb? Additionally I have a huge amount of dry rock. 3x55 gallon buckets of it. I don't think I want to cycle with only dry rock, I would rather get some live rock just to get things moving sooner. But again, should I plan for 50/50 with the dry rock to save on costs?

This is an expensive hobby and I would rather have the money for critters than gear, but I also want to give them a good safe home. So I'm looking to only cut costs where it's smart to do so. I'm also trying to set things up the right way first, so I don't mind taking my time with it. Flip side of that coin - that's an empty tank in my living room. I'm looking forward to progressing that into at least having some water in it!

Thanks for looking, that's quite the brain dump there. Feel free to point me to any resources you feel appropriate, ask me any questions you like etc. Take care!

IMG_1867.jpeg IMG_1866.jpeg
Tank looks nice so far, I like the stand for the tank too!!!
 

Coxey81

Well-Known Member
View Badges
Joined
Aug 25, 2021
Messages
868
Reaction score
1,561
Location
Huntsville
Rating - 0%
0   0   0
I'll throw in some things that might help you. I'm really only familiar with my equipment, so I won't give any advice there unless it's something I'm for sure about.

First, the BRS 5 minute is a great place to start and taught me alot, so its good your watching it. And starting with a plan of doing a FOWLR first is a good plan as well imo. I wouldn't even think much about corals at this point other than equipment you would want.

So here are a few of my suggestions.

1. First off, get a good Rodi system and mixing station set up before you even put water in the tank. Your going to do lots if water changes. And you need 0 TDS.

I would go with something like a BRS 6 stage system with Sediment filter, 2 carbon filters, Ro Membrane, then two Di color changing resins. I would have one inline tds sensor with three probes and a pressure gauge. Measure TDS and pressure after carbon. Then TDS after RO membrane, and then after last resin chamber. This will help you know when to change filters, etc. BRS sells all this stuff.

As far as the mixing station you can get as fancy or simple as you want. But I would have the ability to make at minimum 50 gallons. With a 100 gallon system, you may have to do a 50% water change at some point. You could do this with two 30 or 40 gallon brutes. One for fresh rodi, one for mixed salt. And you could use them both if you had to do a 50% change. Have a way to heat the water and mix the salt. That could be powerheads, pumps, etc. Also figure out how you want to suck out the water and refill, etc. Honestly making good water is the biggest part, so I'd stop and plan out how you are going to do that before anything else.

2. The live rock vs dry rock debate isn't one I will say much about, but I will say mine was dry and I have had very little issue with pests. But, it did take longer for mine to mature. I think patience is definitely something that is helpful in the hobby, go slow and don't rush things.

3. Keep the lights off at first. Be prepared and get good at controlling nutrients before every thinking about adding corals. Once the tank is cycled, start adding fish and a clean up crew slowly and work on controlling PO4 and NO3 when they start to rise with chaeto, or whatever. I have a chaeto max light and it works great. Once you can control it and the tank is mature and gone through some ugly phases, then start turning the lights on slowly. 3 or 4 hours a day at first. Up it as long as you arent having algae growth. Do that til you you get some coralline growth (you can seed or scrap of snails, etc). Then start thinking about corals.

4. Get some good tests kits. Some I can personally recommend.

PH - salifert will work or red sea.
NO3 - I'd get hanna HR
P04 - Red sea or Hanna ULR (be able to low)
Calcium, Alk, and Mag (Red Sea or Hannas)

Whatever you do, make sure you get good ones, watch videos of the test so you know what all goes into it and how to perform correctly, etc before you buy. I started with mostly red sea stuff, but they weren't low range enough. Then l switched to a LR red sea kit. But they were more work than I liked. Now I have all hannas.

5. I would personally QT all fish by Jay Hemdals Protocol before adding. It won't prevent disease and pest from coming in on corals or rock.... but it will greatly raise your chances of having a clean tank.

6. Make sure your rock is on the glass and good and stable before adding sand. Killed my pistol shrimp cause he tunneled and trapped himself. You can cut some PVC nubs to raise flat rocks off the glass so tunnel diggers don't get trapped or smashed, but have space. And your rock won't collapse if it's done so it won't move.

7. Plan your sump out with your equipment best you can. I'd even think about what dosing pumps and containers you may add later. Way better to get that set up before correctly than have to tear it all out and rearrange later.

8. Research, research, research. I read and researched heavily for about 3 months before I started and it worked out for me well. You've come to a great place to start.

Feel free to send me questions, I'll try to help when I can and be honest if I don't know.
 
Last edited:

bradreef

Well-Known Member
View Badges
Joined
Aug 12, 2013
Messages
766
Reaction score
646
Rating - 0%
0   0   0
Here's a fun question though - 75 gall plus 20gallon sump, I need to cook up about 100 gallons of water. How do I uhhhhh start the tank if I'm only making 50 gallons at a time? Is it okay to just chill out in the tank? I can drop a powerhead in there and a heater I suppose. I'm not really sure.


Yes, add a heater and powerhead


My next big question, what should if anything be reused. I have a 5 gallon bucket of sand from the old tank. Should I rinse it and cut it 50/50 with new caribsea live sand? Or is that risky and dumb? Additionally I have a huge amount of dry rock. 3x55 gallon buckets of it. I don't think I want to cycle with only dry rock, I would rather get some live rock just to get things moving sooner. But again, should I plan for 50/50 with the dry rock to save on costs?


I used roughly 15% live rock and it worked well
 

dedragon

5000 Club Member
View Badges
Joined
Feb 23, 2019
Messages
6,109
Reaction score
4,535
Rating - 0%
0   0   0
Not shown is a seaclone protein skimmer that will get plumbed into the sump.
Do yourself a favor and throw out that skimmer. It will be more of a pain just trying to get this skimmer to pull anything out of the water than running the tank with no skimmer at all. These are probably the worst skimmers on the market and dont really do much more than just o2 exchange, tbh.
Would be really cool to see a diy skimmer as well but might be more cost effective to go with something like an aquamaxx skimmer if on a budget as those are really aggressively priced skimmers for the price. Just dont want you to do what i did and try to get that skimmer to run better while pulling out your hair, when it just wont get any better.

I have a literal hefty bag full of bio balls as well.
Bioballs are pretty useless for saltwater tanks tbh. Live rock will give you all the surface area you need but if you did want more you could add bio media like matrix to the sump

UV sterilizer - these seem like a really solid upgrade that isn't all that expensive to add.
good uv systems are actually pretty expensive like aqua uv. The cheaper ones like green machine do have their purpose for stuff like dinos I think but not if its being used to control parasites.
The lights on the sump are popbloom turing 30s, which while older should still suffice. I read about people soldering and replacing the LEDS, that's in my wheelhouse to do if needed. I have 4 of those lights in total, I'm guessing 2 will do the tank nicely.
These lights will definitely work but are not the greatest for saltwater as they can give you big hotspots of par and lose a lot of light on the edges. They also appear to be in pretty bad shape and these lower cost leds usually go bad faster than better built systems. Might have to change out the drivers and some leds as well as clean out any corrosion that may be on any contacts.
I really like the seneye monitoring system.
Seneye doesnt seem to get great reviews for any of their monitoring from what I have seen. I wouldnt trust the pH as it doesnt use a lab grade, double junction pH probe, ammonia monitoring isnt needed ever past the cycle, and even their par seems to be misreporting high numbers. If you want a better reef controller look into Apex, Ghl, or hydros. There is a reason these are a lot more expensive. There is also the option of using the Reefpi, which uses a raspberry pi and it more complicated but should be right up your alley as you are probably great with tech.
 

dedragon

5000 Club Member
View Badges
Joined
Feb 23, 2019
Messages
6,109
Reaction score
4,535
Rating - 0%
0   0   0
I think I got all the things I would plan to change if this was my tank, but there was a lot of info in there. I also want to say welcome and glad to have you aboard the forum.
Just wanted to put some input on what to change as it will give you a better idea of what it would cost in the future and maybe stop you from having to replumb new equipment later which is a huge annoyance when the tank is fully filled with water.

also @Coxey81 wrote most of the setup information very well and I agree with that info so didnt need to reiterate on what they wrote further.
 

Coxey81

Well-Known Member
View Badges
Joined
Aug 25, 2021
Messages
868
Reaction score
1,561
Location
Huntsville
Rating - 0%
0   0   0
Do yourself a favor and throw out that skimmer. It will be more of a pain just trying to get this skimmer to pull anything out of the water than running the tank with no skimmer at all. These are probably the worst skimmers on the market and dont really do much more than just o2 exchange, tbh.
Would be really cool to see a diy skimmer as well but might be more cost effective to go with something like an aquamaxx skimmer if on a budget as those are really aggressively priced skimmers for the price. Just dont want you to do what i did and try to get that skimmer to run better while pulling out your hair, when it just wont get any better.


Bioballs are pretty useless for saltwater tanks tbh. Live rock will give you all the surface area you need but if you did want more you could add bio media like matrix to the sump


good uv systems are actually pretty expensive like aqua uv. The cheaper ones like green machine do have their purpose for stuff like dinos I think but not if its being used to control parasites.

These lights will definitely work but are not the greatest for saltwater as they can give you big hotspots of par and lose a lot of light on the edges. They also appear to be in pretty bad shape and these lower cost leds usually go bad faster than better built systems. Might have to change out the drivers and some leds as well as clean out any corrosion that may be on any contacts.

Seneye doesnt seem to get great reviews for any of their monitoring from what I have seen. I wouldnt trust the pH as it doesnt use a lab grade, double junction pH probe, ammonia monitoring isnt needed ever past the cycle, and even their par seems to be misreporting high numbers. If you want a better reef controller look into Apex, Ghl, or hydros. There is a reason these are a lot more expensive. There is also the option of using the Reefpi, which uses a raspberry pi and it more complicated but should be right up your alley as you are probably great with tech.
I also agree with dedragon on all of this. I don't know anything about the lights, but I would take his word for it.

I have an aquamax skimmer and it works well.

You don't need the bio balls as long as you have enough reef rock.

I don't know much about the UVs, and personally I wouldn't worry about getting one at first.

I also agree about seneye. Electronics really just aren't the best for measuring chemicals in water. Especially hobby grade ones. Ph is easy to measure with a chem test. Salinity is easy with a good refractometer. And with a tank your size and a good ATO, it's gonna take alot to get salinity swings. I test everything once a week and the things that almost never change are PH and salanity. If you want something more sophisticated later then maybe look at the apex. But I don't really trust something automated to test and dose.

If you decide to run carbon I would do Rox-08 (and rinse it) or chemipure blue. I was running bituminous and my coral beauty got HLLE disease. Since I stopped the carbon it has stopped getting worse and seems to be healing slowly.

Kasa Smart power strips or equivalent are cheap and great for controlling stuff in the your sump. I have a Kasa, but I would look at GHome cause I think it as more abilities. That was something I added later (built in timers, works with alexa, etc., can make programs/routines). I'd definitely put one in.

If you look for other lights, I can highly recommend AI primes and they pair great with Nero wavemakers. Not the cheapest. But they are sooooooo worth it and you can find used.

Inkbird with dual heaters, dual temp probes, and built in wifi works great for controlling some titanium brs heaters.

I'd do a tunze ATO with at least the timer cutoff and float sensor.

I have random flow heads and they work well as long as your flow is high enough.

Honestly alot of people go the UPS route for backup, but the best its gonna do is run your wavemakers for a few hours and those batteries won't last fmbut a few years. I would get a plen-plax b-11. They are cheap, battery powered, will sense when power goes out, and run for two days on two d batteries. The inkbird will let you notify on your cell if your temp drops or if the two temp probes read different. One probe in tank and one in sump, when they read different you know your pumps most likely off via notification. Then I'd get a generator or maybe a even a inverter for your vehicle if it can handle the watts you would need. My 40 gallon breeder with 20 gallon sump with everything running pulls about 600 watts. I put a 800 watt inverter in my tahoe at first, but have since picked up a small generator.

I have 3 kamoer x1 pumps and can reccommend them for dosing.

I wouldn't skip on gear, I'd do it right from the get go. Even if you have to wait a year to add your first fish, lol

You'll just end up spending it within a year or two anyway to upgrade.
 
Last edited:
OP
OP
E

Eric_T

New Member
View Badges
Joined
Jan 30, 2023
Messages
9
Reaction score
50
Location
USA
Rating - 0%
0   0   0
Man! What a great bunch of responses. Thank you all, really.

I kind of knew the craigslist action was going to be a bit of a gamble. I did get a great tank and stand, and that sump looks really functional for what I want to do, I think. Having the built in auto topoff reservoir is really nice.

My first looks at the skimmer reviews online made it seem like it might not be the best idea, I was hoping it would provide a decent starter - sounds like it just sucks. I am big on the buy once/cry once, the most expensive tool is the one you buy twice, etc etc theory. Doing it right first is cheaper long run, and more enjoyable. Taking the time to quote each of the responses above will make me late for work so just please take a big group thank you, and I'm paying attention to all of it. You guys rock!

Step one - water filter. Going to solve this one first.

So here's my idea. going to bounce this off the collective reef brain (coral) here (punnnns)

The house RO filter is under the kitchen sink. My thought is to install everything that would relate to drinking water there, feeding up to the usual dedicated faucet etc. Tee that off into a valve with a quality quick disconnect, so that the feed can be turned to go out of the RO into remaining DI filters. I would then build a hang on shelf for my bucket with the resin filters, so really just the remaining stuff for making clean distilled water for the tank. Plug that in, let that cook up for as long as needed, when done unplug and store the saltwater stages of the filter. Unless those cartridges assume to need to be always under pressure, I don't know about that. This works in my head - what do you guys think? I'm just trying to get the most usage out of the filter, yes I will have to change filters more often. And the notes above about the extra TDS sensors and gauges inline sounds smart.

I thought bio balls were a thing. They are not! I love it. They are annoying.

The lights I was really hoping would be the best part of that buy. If I blew 200$ but learned a lesson... yeah I still blew 200$. Oops. I would rather lose some money than fish/have a crappy tank. I won't be needing lights for a fair bit so that's okay.

The seneye monitor was attractive to me for the online monitoring portion, and the par meter. But if the sensors suck then it's really not that good. I will keep researching those, that isn't needed too soon anyways. Definitely want to run live monitoring. My job is in IT, but I also do woodwork and weld. Not afraid to build what I need in either category.

One question here, I see several people saying to throw that live rock right on the glass. That makes me a little nervous, it isn't light stuff. The tank came with those plastic grids to hold up the rock - is that a bad idea to use?

I don't mean to forget anyones comments here. Just know that my setup is going to start FOWLR, with the plan to move to the easier/hardier corals. Basically, I'm trying to build myself the 5 minute BRS guide tank, but I'm well aware it will take a good year or more to do so. Thanks again for keeping up with my early morning coffee fueld scattered thoughts here!
 
OP
OP
E

Eric_T

New Member
View Badges
Joined
Jan 30, 2023
Messages
9
Reaction score
50
Location
USA
Rating - 0%
0   0   0
Oh also on the RODI system:


They show the DI section seperated from the main. Kind of exactly what I was thinking of doing with a few feet of extra tubing, disconnect between the two sections and extra valves in place to divert it to make DI mode only, or T it to both.
 

Coxey81

Well-Known Member
View Badges
Joined
Aug 25, 2021
Messages
868
Reaction score
1,561
Location
Huntsville
Rating - 0%
0   0   0
Man! What a great bunch of responses. Thank you all, really.

I kind of knew the craigslist action was going to be a bit of a gamble. I did get a great tank and stand, and that sump looks really functional for what I want to do, I think. Having the built in auto topoff reservoir is really nice.

My first looks at the skimmer reviews online made it seem like it might not be the best idea, I was hoping it would provide a decent starter - sounds like it just sucks. I am big on the buy once/cry once, the most expensive tool is the one you buy twice, etc etc theory. Doing it right first is cheaper long run, and more enjoyable. Taking the time to quote each of the responses above will make me late for work so just please take a big group thank you, and I'm paying attention to all of it. You guys rock!

Step one - water filter. Going to solve this one first.

So here's my idea. going to bounce this off the collective reef brain (coral) here (punnnns)

The house RO filter is under the kitchen sink. My thought is to install everything that would relate to drinking water there, feeding up to the usual dedicated faucet etc. Tee that off into a valve with a quality quick disconnect, so that the feed can be turned to go out of the RO into remaining DI filters. I would then build a hang on shelf for my bucket with the resin filters, so really just the remaining stuff for making clean distilled water for the tank. Plug that in, let that cook up for as long as needed, when done unplug and store the saltwater stages of the filter. Unless those cartridges assume to need to be always under pressure, I don't know about that. This works in my head - what do you guys think? I'm just trying to get the most usage out of the filter, yes I will have to change filters more often. And the notes above about the extra TDS sensors and gauges inline sounds smart.

I thought bio balls were a thing. They are not! I love it. They are annoying.

The lights I was really hoping would be the best part of that buy. If I blew 200$ but learned a lesson... yeah I still blew 200$. Oops. I would rather lose some money than fish/have a crappy tank. I won't be needing lights for a fair bit so that's okay.

The seneye monitor was attractive to me for the online monitoring portion, and the par meter. But if the sensors suck then it's really not that good. I will keep researching those, that isn't needed too soon anyways. Definitely want to run live monitoring. My job is in IT, but I also do woodwork and weld. Not afraid to build what I need in either category.

One question here, I see several people saying to throw that live rock right on the glass. That makes me a little nervous, it isn't light stuff. The tank came with those plastic grids to hold up the rock - is that a bad idea to use?

I don't mean to forget anyones comments here. Just know that my setup is going to start FOWLR, with the plan to move to the easier/hardier corals. Basically, I'm trying to build myself the 5 minute BRS guide tank, but I'm well aware it will take a good year or more to do so. Thanks again for keeping up with my early morning coffee fueld scattered thoughts here!
At work, but I'll read though all this later today and give my thoughts tonight. Thanks for the appreciation!
 

Coxey81

Well-Known Member
View Badges
Joined
Aug 25, 2021
Messages
868
Reaction score
1,561
Location
Huntsville
Rating - 0%
0   0   0
Oh also on the RODI system:


They show the DI section seperated from the main. Kind of exactly what I was thinking of doing with a few feet of extra tubing, disconnect between the two sections and extra valves in place to divert it to make DI mode only, or T it to both.
That's basically exaclty what I have. Sediment, carbon, carbon, ro membrane...... then two di resins. You only technically need one di resin, but if you use two it allows you to completely use up the first then move the second one to the first, and refill the second. If that makes sense. (silica can leak before the color completely changes so it's recommend to change 3/4 color change, but with two you can use up the first completely, then swap and refill)

20210912_130311.jpg
 

Coxey81

Well-Known Member
View Badges
Joined
Aug 25, 2021
Messages
868
Reaction score
1,561
Location
Huntsville
Rating - 0%
0   0   0
Man! What a great bunch of responses. Thank you all, really.

I kind of knew the craigslist action was going to be a bit of a gamble. I did get a great tank and stand, and that sump looks really functional for what I want to do, I think. Having the built in auto topoff reservoir is really nice.

My first looks at the skimmer reviews online made it seem like it might not be the best idea, I was hoping it would provide a decent starter - sounds like it just sucks. I am big on the buy once/cry once, the most expensive tool is the one you buy twice, etc etc theory. Doing it right first is cheaper long run, and more enjoyable. Taking the time to quote each of the responses above will make me late for work so just please take a big group thank you, and I'm paying attention to all of it. You guys rock!

Step one - water filter. Going to solve this one first.

So here's my idea. going to bounce this off the collective reef brain (coral) here (punnnns)

The house RO filter is under the kitchen sink. My thought is to install everything that would relate to drinking water there, feeding up to the usual dedicated faucet etc. Tee that off into a valve with a quality quick disconnect, so that the feed can be turned to go out of the RO into remaining DI filters. I would then build a hang on shelf for my bucket with the resin filters, so really just the remaining stuff for making clean distilled water for the tank. Plug that in, let that cook up for as long as needed, when done unplug and store the saltwater stages of the filter. Unless those cartridges assume to need to be always under pressure, I don't know about that. This works in my head - what do you guys think? I'm just trying to get the most usage out of the filter, yes I will have to change filters more often. And the notes above about the extra TDS sensors and gauges inline sounds smart.

I wouldn't do this the way you are saying.

1. Youll need plastic quick disconnects IMP to be sure you arent adding any metal back in after you RODI. They dont come in a quality version I have found, I do use some for my hose to pump water to my tank though. This may not be a big deal since you'll be running through resin afterwards, but still its reason #1 id be against it. You could have a valve on tubing that you cut off and just use the john guest union connector as your disconnect. Those are quality, but not what I think of when I think of disconnects.

2. Are you going to hang the filters on a shelf on the bucket itself? Like a brute? They are pretty heavy. And I'm not sure that will work out for you. Maybe if the brute was on a solid platform with wheels with something raised off the platform to mount them on. I may be invisioning some or all of this wrong though, lol.

3. They need to probably stay under pressure, but I'm not positive on it being critical. I know they will leak if you don't have some valve to close them off. Unconnected and reconnecting this stuff all the time I invision you constantly wiping the floor, and I do that enough as is.

4. I don't think you are going to want to have to unhook and store them, then get them back out and hook them back up every time you want to make water. I think that's going to big hassle to you. Especially setting up heaters, powerhead, tds sensors, etc.

5. I think your wife, if you have one, will kill you for the mess you are making in her kitchen every week or so. Lol

6. If its under the sink its going to be harder to check tds readings and pressure gauge, you could do it though.

Personally, unless you just absolutey dont have the space to put it somewhere like a laundry room, etc. I would not do it that way.

I'd either do a complete seperate system or pipe it from your filter under the sink to another area where you keep the buckets, di filters, heaters, etc permanently set up.

My tank is a 40 gallon with 20 gallon sump. About 53 gallons in it. So about half yours. I go through about 15-20 gallons every two weeks. 10 for WC, 10 for ATO from evap, etc. It takes me (even with a rodi buddi booster pump) about 2.5 hours to make 10 gallons. Mine is a 75gpd system though. You'll have to do about twice what I do, so probably the sameish amout of time or longer. Then you'll have to mix the salt, which takes time (several hours) to dissolve. Then you have to check it. Probably add some more. Etc.

Saltwater tanks are enough work as it is. I can go in flip a couple switches and I'm making water. Then when I do a water change I use a python system to siphon it to a sink and then pump to pump the new water back in. (That's where my quick connects come in, switch from sink to pump) So I basically roll out a hose and Im in business. I don't move my buckets. Some people do that though, but usually people with smaller tanks than me, and definitely you.

Your ato resevere on that sump proably will need refilling often. I have a canopy and still go through about 5 gallons every two weeks in the summer in the south. In the winter its about every 1.5 weeks.

I also would have two buckets. One for salt and one for fresh. Your gonna have left over salt water, maybe not much but usually some. You can't just put fresh rodi back in there and use it for your ato. That will lead to salinity swings. So you'll have to dump it out every time.

Here's the way my weeks usually goes water making wise, cause I'm not on a perfect schedule with life I don't always do stuff the same time etc, as I assume most aren't.

I make 10 gallons if rodi as soon as my rodi bucket is empty or I may need more to refill my 5 gallon ato container. Then I just leave it in there. After a water change I'll usually refill my salt bucket with ~10 gallons of fresh rodi (depending on how much was left in there after WC). Then I wait to add salt. Two days before or the night before I'll mix my salt to what i know will give me just under my goal. Let it mix a couple of hours, then test. And add to bring it up to goal. Let it mix over night, then test the next day and I'm usually spot on or close. Then at least about two hours before I plan to do my water change I'll start heating the water and roll out my hose.

Not trying to knock your plan at all, just trying to help you get a good idea of what all is going to go into to doing it your way and help make your life a whole lot easier, lol.

But.....


Long story short. I would make your water and mixing station as permanent as possible and pipe/ pump the water to the tank if you can.
I thought bio balls were a thing. They are not! I love it. They are annoying.

The lights I was really hoping would be the best part of that buy. If I blew 200$ but learned a lesson... yeah I still blew 200$. Oops. I would rather lose some money than fish/have a crappy tank. I won't be needing lights for a fair bit so that's okay.

The seneye monitor was attractive to me for the online monitoring portion, and the par meter. But if the sensors suck then it's really not that good. I will keep researching those, that isn't needed too soon anyways. Definitely want to run live monitoring. My job is in IT, but I also do woodwork and weld. Not afraid to build what I need in either category.
There isn't much I need to monitor regularly online. On a day to day it is mainly knowing my temp is good, and my return pump is running. Everything else can wait til I get home. If I'm away on vacation for a week it would be nice to know my wavemakers and lights are working.

Nothing is going to die or have issues super quick unless a dosing pump dumps a bunch for some reason. But if you want to monitor, go for it. Personally I would spend the money elsewhere for now.

If I was you and you can weld, I would make a metal frame for inside of the front of your stand. Then make that piece between the door that's for support removable. It would make it so you could take your sump out to clean. I so wish I could do that with mine.
One question here, I see several people saying to throw that live rock right on the glass. That makes me a little nervous, it isn't light stuff. The tank came with those plastic grids to hold up the rock - is that a bad idea to use?

I dont see anything wrong with using the plastic grid. Main thing is I just wouldnt put the rocks on top of the sand. Cause the sand is going to get moved and the rocks will then move with it.
I don't mean to forget anyones comments here. Just know that my setup is going to start FOWLR, with the plan to move to the easier/hardier corals. Basically, I'm trying to build myself the 5 minute BRS guide tank, but I'm well aware it will take a good year or more to do so. Thanks again for keeping up with my early morning coffee fueld scattered thoughts here!
 
Last edited:
OP
OP
E

Eric_T

New Member
View Badges
Joined
Jan 30, 2023
Messages
9
Reaction score
50
Location
USA
Rating - 0%
0   0   0
Good points. I was hoping for some modularity with the system, doesn't seem like the fitting quality supports that idea. Scrapping that!

The fixed in place plan is to hook up the filter next to the laundry sink, and I have about a 22x42" space to work with buckets to cook water in. The tank itself is about 20 feet away, but an easy path to it. I have a room on the opposite wall of the tank, which is an exterior wall - its a covered porch that got walled in to become a room by a previous owner. It's not that well insulated and there's no plumbing in there. Closer but I feel like the logistics make it worse than a bucket on wheels.

So that base is interesting. It is in the style of a standard mdf base, but it is instead made from solid 3/4" plywood. And good plywood too. The previous tank owner added 2x4 supports on each back corner and the one in the front middle, but that one is also removable. While the sump is currently caged in at the moment, it can be removed if I pop out that support. I have access to some free metal, not sure what it is - might go check it out and see if I want to weld up a stand with some adjustable leveling feet, make some nice wood facade with epoxied rare earth magnets that just snaps on and looks like a wood stand, but is totally removable. Gonna think on that one.

The tank currently has the back painted black, which I like. But also the sides - and one side has the tiniest chip of paint thats come out. I'm thinking about removing the side paint, is there a good method for doing that without damaging the glass? I feel like more viewing angles will make it more enjoyable.
 

Coxey81

Well-Known Member
View Badges
Joined
Aug 25, 2021
Messages
868
Reaction score
1,561
Location
Huntsville
Rating - 0%
0   0   0
Good points. I was hoping for some modularity with the system, doesn't seem like the fitting quality supports that idea. Scrapping that!

The fixed in place plan is to hook up the filter next to the laundry sink, and I have about a 22x42" space to work with buckets to cook water in. The tank itself is about 20 feet away, but an easy path to it. I have a room on the opposite wall of the tank, which is an exterior wall - its a covered porch that got walled in to become a room by a previous owner. It's not that well insulated and there's no plumbing in there. Closer but I feel like the logistics make it worse than a bucket on wheels.
What about having a fixed in place 40 or 55 gallon brute in the laundry room with either a full 6 stage system or running tubing from the sink to 2 di resins mounted in the laundry room.

Then you can make and store a lot of rodi.

Then build a rolling platform with a 30 gallon brute and set it up with a power strip, pump, heater, power head, etc mounted someway.

Store it in you spare room when not in use. When you get ready for to make salt water roll it to the laundry, pump rodi in it, roll it back in the spare room or where ever and plug it up to mix your salt. Then when read for water change roll it to the tank and get it heating. Then siphon it out via python and pump in new.

I'd think about that spare room alot though, how cold does it get? How hot?

With a wall on the other side you could run water to that room (probably pretty easy if you have a crawlspace) and a drain line and run some pipes through the wall to the tank and have a automated or semi automated WC system. That's what I'm going to do on my next tank when my daughter moves out.

I'm going to have my sump and everything in there so it's all easy to get to and work on.


So that base is interesting. It is in the style of a standard mdf base, but it is instead made from solid 3/4" plywood. And good plywood too. The previous tank owner added 2x4 supports on each back corner and the one in the front middle, but that one is also removable. While the sump is currently caged in at the moment, it can be removed if I pop out that support. I have access to some free metal, not sure what it is - might go check it out and see if I want to weld up a stand with some adjustable leveling feet, make some nice wood facade with epoxied rare earth magnets that just snaps on and looks like a wood stand, but is totally removable. Gonna think on that one.
Cool, anyway you can figure out how to take the sump out would be great imo.

The tank currently has the back painted black, which I like. But also the sides - and one side has the tiniest chip of paint thats come out. I'm thinking about removing the side paint, is there a good method for doing that without damaging the glass? I feel like more viewing angles will make it more enjoyable.


I really don't know, but I'm sure there is some solvent that would do it. I definitely like being able to view my from all sides. If sunlight is going to hit one side heavily you might want to leave it though. Also, consider a 3D background for your back glass. Now is the time to do it if you might want one.
 
Last edited:
OP
OP
E

Eric_T

New Member
View Badges
Joined
Jan 30, 2023
Messages
9
Reaction score
50
Location
USA
Rating - 0%
0   0   0
So the room on the opposite side of the tank, even though not that well insulated - really useful. It's a full 8x20' space, no reason to not make that the salt water kitchen.
I do have my 6 stage ro/di filter on its way from BRS. Once in hand I'll take a look at plumbing options to get that set up nicely in that space, with a couple trash cans set up for the pure ro/di and then another to cook up the salt in. Maybe just one to start. There is a "window" from inside the living area outside to that covered porch. I can open that and feed a line in easily to pump in for water changes. The flexibility is really nice there.
While the filter ships let's talk sumps! This is babys first sump. I think it's mostly nice but you be the judge, picture in bound and I'll make a second post talking about it.
 

Attachments

  • IMG_1890.jpeg
    IMG_1890.jpeg
    150 KB · Views: 35
OP
OP
E

Eric_T

New Member
View Badges
Joined
Jan 30, 2023
Messages
9
Reaction score
50
Location
USA
Rating - 0%
0   0   0
So the sump came with one very large diameter filter "sleeve". I won't call it a sock as its the very thin plastic mesh type, I did find a BRS video talking about socks vs sleeves and how the socks are much more preferable. The water entry area is pretty large, about 14" across there. The whole sump being about 12" from front to back edges. A single sleeve seems kind of... meh?

So the question on the entry there is - do I have enough room to do better. And, if so - what is better? I'm a big fan of the engineering idea behind the feed roller style. That's a really nice advancement. Short of it being expensive, are there any filtration downsides? I have enough room to accomodate one I think.

Moving on to the second chamber, about 6" wide there. Not a lot of room. That seems like the best space to drop in a skimmer, and pop in heaters. Any other considerations to be made in that space? And is that a decent plan?

Last chamber - I have about 7-8" of width remaining, return pumps will live here. I would like to have some refugium action in the box somewhere. Is this the best place, and is this enough room to have enough macroalgae that would help out the 75 gallon tank above? Or should that be in a different section. That primary entry area is the biggest, had enough current to rotate a ball of green stuff too.

If youre eyeballing box 4 thats an isolated ATO section. Really happy I got that!
 
Back
Top