Welcome to my build thread. If pictures are worth 1000 words, then I plan on saving myself some typing with some photos.
I have a few "strategies" or "philosophies" that I have always stuck with in reef keeping:
Steps completed:
I had a 75 gallon in my old house. I have moved the stock from the 75 into the new aquarium. The 75 is currently serving as the QT tank.

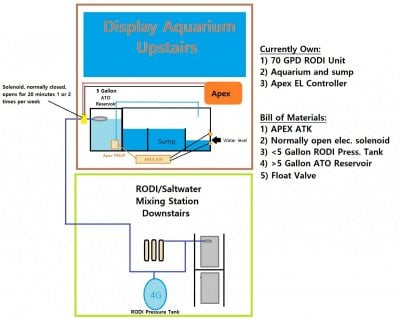
This setup has been great thus far. Best part of all has been the spotfree car wash I have setup in my garage. It is basically an ATO reservoir with a standard float valve. I turn a knob and 5 gallons of spot free water (0TDS) drains into the reservoir with a freshwater pump attached.
Here is an image of the aquarium:

I want to point out my "favorite" hack/DIY feature is definitely the stand lights. I have always powered LED stand lights from the Apex EL 24V power supply. They would turn on when I opened the left door. I found myself wanting the lights to go on when either door was opened, so it was just a quick little DIY hack.


I spliced the cable to run to two different IR switches that are wired in parallel. After the IR switches, I have used two 12V LED strips that are wired in series. When either door is opened on my stand, both lights will come on. When both doors are closed in the stand, both lights go off.

This is what it all looks like when the lighting is on.
My next priorities are stocking the tank with inhabitants. I welcome any comments or suggestions, and thanks for taking a look at my build.
I have a few "strategies" or "philosophies" that I have always stuck with in reef keeping:
- Over-do equipment
- Under-do stock list
- Stock inhabitants that can adapt to conditions - avoid trying to adapt conditions to accommodate inhabitants
- Limit anything that requires supplemental support (spot feeding of filter feeders, testing and dosing of non-standard trace elements, etc.)
- Prefer livestock that has a unique lifestyle (think clown & 'nem, Pistol shrimp & Goby)
- 165 Gallon Seamless Bowfront from Aquavim
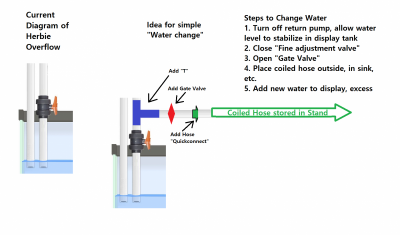
- The aquarium is drilled for an overflow and return, but I have converted the system in a Herbie system by adding a return line around the back of the aquarium, and using both drilled lines for overflows to the sump.
- Apex EL Reef controller
- Tunze ATO with redundant reservoir
Steps completed:
I had a 75 gallon in my old house. I have moved the stock from the 75 into the new aquarium. The 75 is currently serving as the QT tank.
This setup has been great thus far. Best part of all has been the spotfree car wash I have setup in my garage. It is basically an ATO reservoir with a standard float valve. I turn a knob and 5 gallons of spot free water (0TDS) drains into the reservoir with a freshwater pump attached.
Here is an image of the aquarium:
I want to point out my "favorite" hack/DIY feature is definitely the stand lights. I have always powered LED stand lights from the Apex EL 24V power supply. They would turn on when I opened the left door. I found myself wanting the lights to go on when either door was opened, so it was just a quick little DIY hack.
I spliced the cable to run to two different IR switches that are wired in parallel. After the IR switches, I have used two 12V LED strips that are wired in series. When either door is opened on my stand, both lights will come on. When both doors are closed in the stand, both lights go off.
This is what it all looks like when the lighting is on.
My next priorities are stocking the tank with inhabitants. I welcome any comments or suggestions, and thanks for taking a look at my build.


