I have been waiting on the OSIX for the OR3 150's for some time and I finally got my hands on them a couple weeks ago. It seemed like a long wait, but I can say without a doubt that it was well worth the wait. Orphek has hit it out of the park with OSIX. The ability to dim my OR3 150's gives me the ability to really mix the lighting anyway I want for coral growth and color I want. The dusk to dawn is amazing with these lights. I now have the ability to control all of my led's.
My current setup is as follows:
Main Lighting
Supplement Lighting
Ok. Well lets get to the meat of things here. The Upgrade!
Tools Needed
One of the things that gravitated me to the Orphek brand is that they make their lights upgradable. This allows me to upgrade my lights anytime I want to the latest and greatest without having to break the wallet. Thats exactly what I did hear. Just looking at a few components. The power supply for the OSIX OR3 150's is a massive 480w Tried and True Mean Well unit. This is the same top of the line power supply we have come to expect from all the other Orphek lighting choices. This power supply will control up to 6 OR3-150's.

Just for comparison. I took a photo of a single OR3 150 power supply next to the OSIX OR3 power supply. As you can see. You will have a huge savings in real estate to mount your new power supply. This one unit replaces 6 of the single power supplies... Making it easier for cable management.

Also accompanied with the power supply. You will have the controller which gives you all the magic to control your LED bars. Its a very light and quaint compact designed box.

From the controller one cable fans out to 6 cables to control each one of your LED bars. Each one is clearly marked with a number to let you know which or3 bar is being connected to which channel in the Orphek app. A little on this later.

Ok. Now to the best part.
The Upgrade
Orphek has a put together the following step by step document for upgrading your OR3 bars. I have provided link below:

 orphek.com
This can also be seen in a still video that is provided here:
Following the directions provided by Orphek are pretty straight forward. Below I would like to point out some pointers to make your upgrade a little easier.
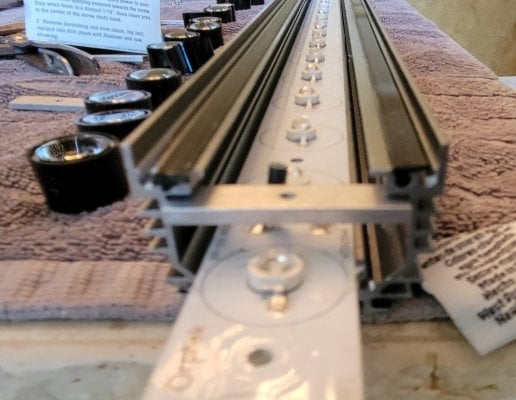
You will need a nice open area to do your work. I decided to use the dining table. I put some towels down to prevent any scratches on the table and me getting in to trouble") . After followig the procedures above to disassemble my existing OR3. I placed the regular OR3 strip above the new OSIX OR3 led strip. You will see a noticable difference right away. They are shipped with a minumum of 6 lenses and those lenses are to protect the resistor's that is embedded in the led strip.
. After followig the procedures above to disassemble my existing OR3. I placed the regular OR3 strip above the new OSIX OR3 led strip. You will see a noticable difference right away. They are shipped with a minumum of 6 lenses and those lenses are to protect the resistor's that is embedded in the led strip.

Below is a close up of one of the resistors. These have been protected from the factory, so you should take care not to bend them during installation. I left the lenses on as a protector.

Just a side note. I used the following paste below. You can pick it up on Amazon at the following link below the picture. It took about 1.5 tubes per OR3 150 fixture.

Amazon product
Now after you have applied your thermal paste to the rail and the back of the LED. The installation is not hard, but you will need to follow the following steps if you only want to do it once. Depending on your light fixture. The latests ones have about 15 screws to hold the outer black lens cover to the rail. This requires the installation of the a corresponding aluminum nut to be placed in the rail every 3 led's.
Now this is very important, because this doesn't allow you to install the led strip and then install the nuts later. This will not work. That is because the led's are higher than the slot for the bolts. See example pic here. The bolt will hit the resistor and you will not be able to install.

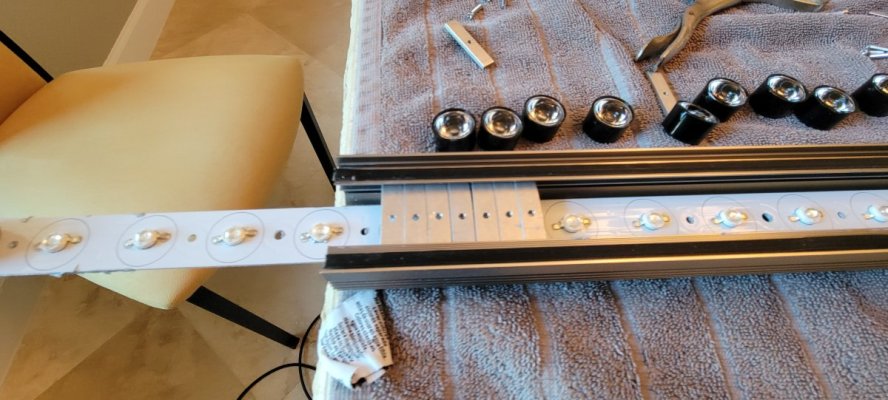
Now there are 3 resistors. You will have to install the bolts into the rail at the same time with the led strip. I installed the led from left to right. On the far left was the power connectors. If you use the same alignment. You will need 3 bolts between the second and third resistor and 7 between the first and second. Here is a picture of reference.
Note: Leave the lens caps on for protection during intall.

If you have 2 people. You can slightly hold the led strip off the rail and move from left to right. Here is the 3 bolts between the 2nd and 3rd resistor. Note here is that I leave the len's on for protection of the resistor.

As you continue to slide the led form in from left to right. After the 2nd resistor. You can install the 7 bolts between resistor 1 and 2. All the other bolts can be installed from right side. Once you have the led strip installed evenly on the rail. You will need to install the lens caps on each led. Be sure to spread the bolts out after each 3 leds to line up with the cover. Thats it. You are all done except hooking up the power.
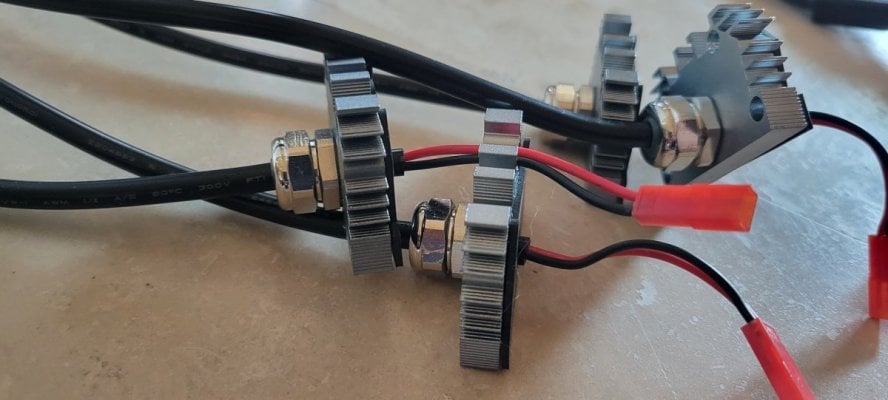
The power connectors on the OSIX are a little smaller than the previous OR3 bars as seen here. So you have to replace them with the new supplied connectors.

Now once you hook up the power connectors and fasten. You are all done. The next step is to pair up your new Osix to the app. In the app you will have to hit the plus botton at the top right of the menu to add device. Then you will need to press the reset button on the control 4 times to get it into pairing mode. Once this is done it only takes a minute to pair up and you are off and running.
As I have only had these a couple weeks. I have not tuned them exactly to where I want them yet, but here is my schedule for my OR3 blue plus's and OR3 sky Blue's. I used the default setting by Orphek "Helius" and made a few changes for now.

Here is an example of my first time slot one where you can set the power for each led. You can set each individually to what every you want. The number on the OSIX power cable matches the channel you see in the APP.

Thoughts
I'm super happy with OSIX. It shares the same platform/app with the ICON and it was very easy to pair with the app. After mixing the Sky Blues with the blue plus's. I can truely say that this is a winning combination for coral pop. OMG! I can say that all my corals have really responded well. The colors are amazing! The ability to mix the led bar led's at the power you want them has really changed the game. I highly recommend.
I currently have an algae issue going in the aquarium, but I have some pics anyway. I was going to wait until I had the algae under control, but I thought I would share. I had the algae issue before upgrading. This is just a part of my new aquarium wooh's as its only 7 months old now after reset.
FTS

Couple Side Shots


A few Top Downs


My current setup is as follows:
Main Lighting
- 3 - Orphek ICON's
Supplement Lighting
- 2 - Orphek OSIX OR3 150 Sky Blue's
- 2 - Orphek OSIX OR3 150 Blue Plus's
Ok. Well lets get to the meat of things here. The Upgrade!
Tools Needed
- screw driver
- allen wrench
- thermal paste
One of the things that gravitated me to the Orphek brand is that they make their lights upgradable. This allows me to upgrade my lights anytime I want to the latest and greatest without having to break the wallet. Thats exactly what I did hear. Just looking at a few components. The power supply for the OSIX OR3 150's is a massive 480w Tried and True Mean Well unit. This is the same top of the line power supply we have come to expect from all the other Orphek lighting choices. This power supply will control up to 6 OR3-150's.
Just for comparison. I took a photo of a single OR3 150 power supply next to the OSIX OR3 power supply. As you can see. You will have a huge savings in real estate to mount your new power supply. This one unit replaces 6 of the single power supplies... Making it easier for cable management.
Also accompanied with the power supply. You will have the controller which gives you all the magic to control your LED bars. Its a very light and quaint compact designed box.
From the controller one cable fans out to 6 cables to control each one of your LED bars. Each one is clearly marked with a number to let you know which or3 bar is being connected to which channel in the Orphek app. A little on this later.
Ok. Now to the best part.
The Upgrade
Orphek has a put together the following step by step document for upgrading your OR3 bars. I have provided link below:
OR3 LED PCB Upgrade • Orphek Reef Aquarium LED Lighting
OR3 LED PCB Upgrade - Orphek LED PCB Replacement Guide for Upgrading OR3 LED Bars,how to replace the LED PCB of your Orphek OR3 LED Bars and upgrade them.
This can also be seen in a still video that is provided here:
Following the directions provided by Orphek are pretty straight forward. Below I would like to point out some pointers to make your upgrade a little easier.
You will need a nice open area to do your work. I decided to use the dining table. I put some towels down to prevent any scratches on the table and me getting in to trouble
. After followig the procedures above to disassemble my existing OR3. I placed the regular OR3 strip above the new OSIX OR3 led strip. You will see a noticable difference right away. They are shipped with a minumum of 6 lenses and those lenses are to protect the resistor's that is embedded in the led strip.Below is a close up of one of the resistors. These have been protected from the factory, so you should take care not to bend them during installation. I left the lenses on as a protector.
Just a side note. I used the following paste below. You can pick it up on Amazon at the following link below the picture. It took about 1.5 tubes per OR3 150 fixture.
Amazon product
Now after you have applied your thermal paste to the rail and the back of the LED. The installation is not hard, but you will need to follow the following steps if you only want to do it once. Depending on your light fixture. The latests ones have about 15 screws to hold the outer black lens cover to the rail. This requires the installation of the a corresponding aluminum nut to be placed in the rail every 3 led's.
Now this is very important, because this doesn't allow you to install the led strip and then install the nuts later. This will not work. That is because the led's are higher than the slot for the bolts. See example pic here. The bolt will hit the resistor and you will not be able to install.
Now there are 3 resistors. You will have to install the bolts into the rail at the same time with the led strip. I installed the led from left to right. On the far left was the power connectors. If you use the same alignment. You will need 3 bolts between the second and third resistor and 7 between the first and second. Here is a picture of reference.
Note: Leave the lens caps on for protection during intall.
If you have 2 people. You can slightly hold the led strip off the rail and move from left to right. Here is the 3 bolts between the 2nd and 3rd resistor. Note here is that I leave the len's on for protection of the resistor.
As you continue to slide the led form in from left to right. After the 2nd resistor. You can install the 7 bolts between resistor 1 and 2. All the other bolts can be installed from right side. Once you have the led strip installed evenly on the rail. You will need to install the lens caps on each led. Be sure to spread the bolts out after each 3 leds to line up with the cover. Thats it. You are all done except hooking up the power.
The power connectors on the OSIX are a little smaller than the previous OR3 bars as seen here. So you have to replace them with the new supplied connectors.
Now once you hook up the power connectors and fasten. You are all done. The next step is to pair up your new Osix to the app. In the app you will have to hit the plus botton at the top right of the menu to add device. Then you will need to press the reset button on the control 4 times to get it into pairing mode. Once this is done it only takes a minute to pair up and you are off and running.
As I have only had these a couple weeks. I have not tuned them exactly to where I want them yet, but here is my schedule for my OR3 blue plus's and OR3 sky Blue's. I used the default setting by Orphek "Helius" and made a few changes for now.
Here is an example of my first time slot one where you can set the power for each led. You can set each individually to what every you want. The number on the OSIX power cable matches the channel you see in the APP.
Thoughts
I'm super happy with OSIX. It shares the same platform/app with the ICON and it was very easy to pair with the app. After mixing the Sky Blues with the blue plus's. I can truely say that this is a winning combination for coral pop. OMG! I can say that all my corals have really responded well. The colors are amazing! The ability to mix the led bar led's at the power you want them has really changed the game. I highly recommend.
I currently have an algae issue going in the aquarium, but I have some pics anyway. I was going to wait until I had the algae under control, but I thought I would share. I had the algae issue before upgrading. This is just a part of my new aquarium wooh's as its only 7 months old now after reset.
FTS
Couple Side Shots
A few Top Downs